Download Data
Although we recommend using the ClearSKY API for high-volume and automated downloads, the dashboard provides a convenient interface to download data manually. The Download page supports two workflows:
- Single Image -> download imagery from a single date.
- Time-Series -> download multiple dates bundled as one or more ZIP files.
All downloads consume processing units. Before confirming a download, you will always see the processing-unit estimate and your remaining processing-unit balance.
Selecting an Area
You can define the Area of Interest (AOI) in two ways:
- Click an Order on the map -> its WKT geometry appears in the Selection box (you must confirm by pressing Add to selection).
- Draw directly on the map -> the drawn polygon is automatically added to the selection.
Additional features:
- Export / Import -> Save and reload selections.
- Reset map & selection -> Clear all AOIs.
- Note: the selection itself is non-editable once added.
Single Image Download
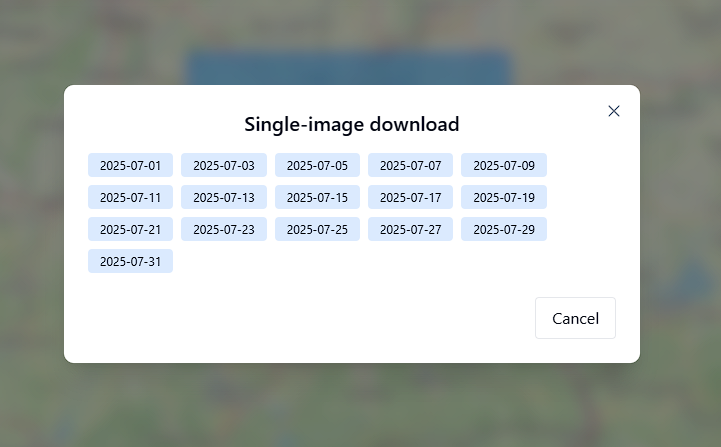
Step 1: Choose a Date
Click Single date to proceed.
You'll see a list of available dates for the selected area.
Step 2: Configure Options
After selecting a date, configure your export settings:
- Model: If multiple orders cover the area, select the model to use (otherwise auto-selected).
- Satellite Constellation: Source satellites used (e.g., Sentinel-1, Sentinel-2, Landsat).
- EPSG Projection: Choose your target projection.
- Use explicit UTM EPSGs (
326xx/327xx) when you want a fixed target zone. - Use EPSG 47000 for auto-EPSG mode, where ClearSKY picks the most suitable UTM EPSG for the request.
- Use explicit UTM EPSGs (
- Resolution: Pixel resolution (default: 10 m).
- Data Type:
UINT8orINT16. - Band Set: Select all 10 bands or a subset.
- File Type: Export format (e.g., TIF).
- Pixel Selection: Controls whether only pixels contained within the AOI are included.
If these exports are shared externally, preserve and pass through the required source attribution notice for the source inputs used in the output. See Source attribution and external use.

UTM Mode
Two extra options appear:
- UTM Data Mode:
- Combined UTM -> merge into one file.
- Per UTM zone -> split into separate files per zone.
- Force Pixel Resolution: Optionally enforce uniform pixel size across zones.
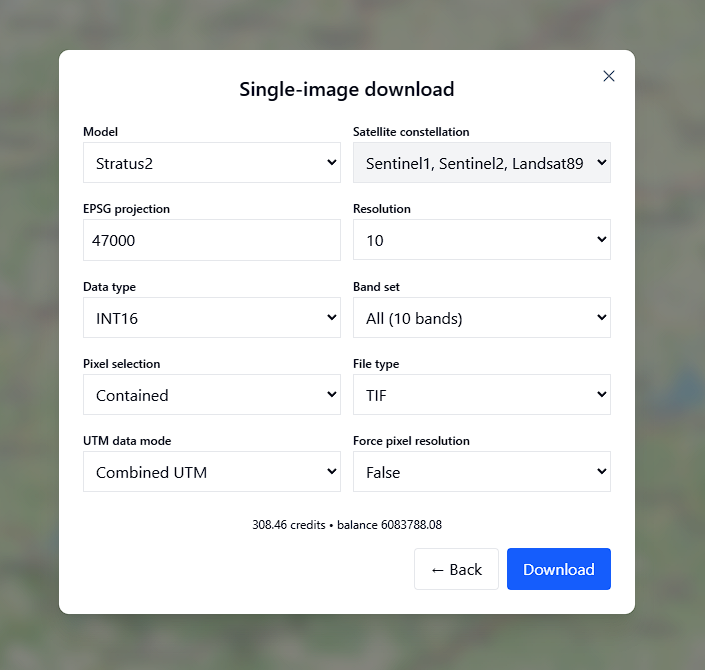
Step 3: Download
At the bottom, you'll see:
- Processing-unit cost for the request.
- Your remaining processing-unit balance.
Press Download to generate the file.
Time-Series Download
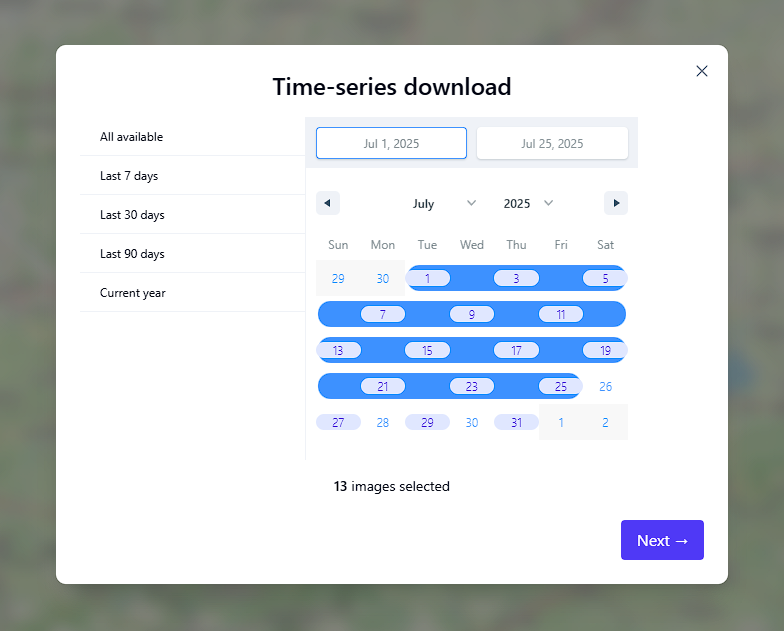
Step 1: Choose a Date Range
Click Time-series to proceed.
You can select a period in the calendar view:
- Use the date pickers or click directly on dates.
- Predefined ranges are available (e.g., Last 7 days, Last 30 days, Current year).
- All selected dates will be highlighted in blue.
Step 2: Configure Options
The configuration step is identical to the single-image flow:
- Model
- Satellite constellation
- EPSG / UTM projection
- Resolution
- Data type
- Band set
- File type
- Pixel selection
The same UTM Data Mode and Force Pixel Resolution options are used for UTM-aware workflows, including auto-EPSG (47000) and explicit UTM targets when relevant.
Step 3: Download
When ready:
- Press Download ZIP.
- The popup closes and imagery begins fetching + zipping.
- Large requests (especially for big AOIs) can take several minutes.
Important notes:
- ZIP files are capped at ~1 GB each. If exceeded, results are split across multiple files.
- You can see the processing-unit estimate and your remaining processing-unit balance at the bottom before confirming.
- When the data is ready, the ZIP will download automatically.
- You can also click the links shown in the download toast at the bottom center of the dashboard.
Time-series downloads are best suited for smaller areas and moderate date ranges.
For large AOIs, long time spans, or bulk data retrieval, the API is more efficient and reliable.
The Download page is best for occasional manual exports.
For larger areas, many dates, or automation, we recommend switching to the ClearSKY API.